
Overview
My View: Lab is well designed and informative; I loved it while solving the challenge.
| Follow @anir0y |
|---|
Task 01: Introduction
Learning Objectives
This room focuses on the following learning objectives:
- Understand common MITM attack vectors and techniques
- Learn to identify indicators of compromise related to MITM attacks
- Master network monitoring tools for detecting suspicious traffic patterns
- Practice incident response procedures for MITM scenarios
Task 02: Lab Connection
Scenario
A routine network monitoring alert at Acme Corp revealed unusual traffic patterns suggesting a possible Man-in-the-Middle (MITM) attack inside the corporate LAN. Over several days, an attacker quietly intercepted communications, redirected connections, and captured user credentials. In this room, you’ll step into the role of a SOC Analyst investigating this incident. Using the provided packet capture and logs, you’ll uncover evidence of three chained MITM techniques.
- ARP Spoofing (network interception).
- DNS Spoofing (redirection).
- SSL Stripping (credential capture).
Important Note
Important Note: To accomplish this room, we will be relying on the network traffic provided in the mitm folder on the Desktop. However, there are other ways to also examine and complete the room.
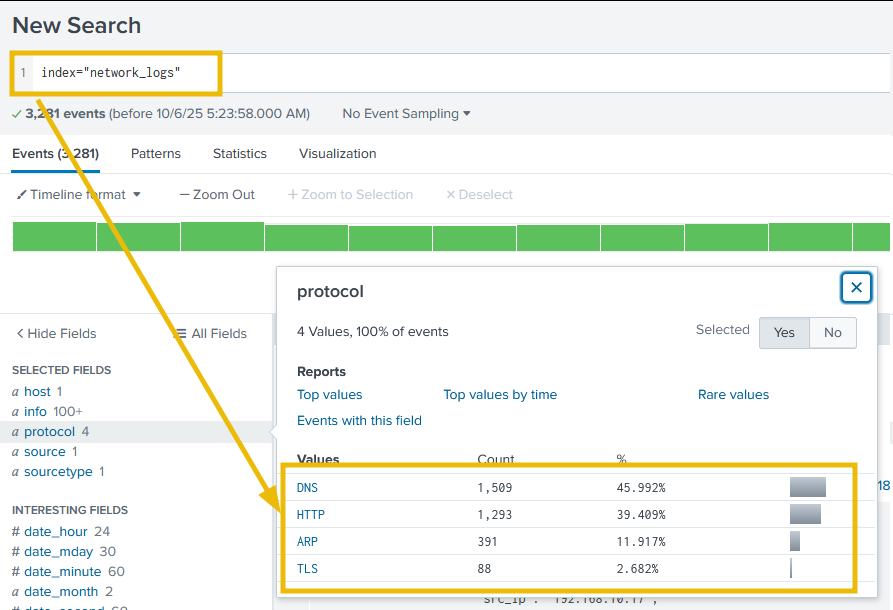
A complete log file named mitm_attack.log, containing the entire attack chain, is placed in the same folder. Same logs are ingested into Splunk, which can be accessed at
MACHINE_IP:8000, and the logs are ingested intoindex=network_logs.
Task 03: MITM Attack: An Overview
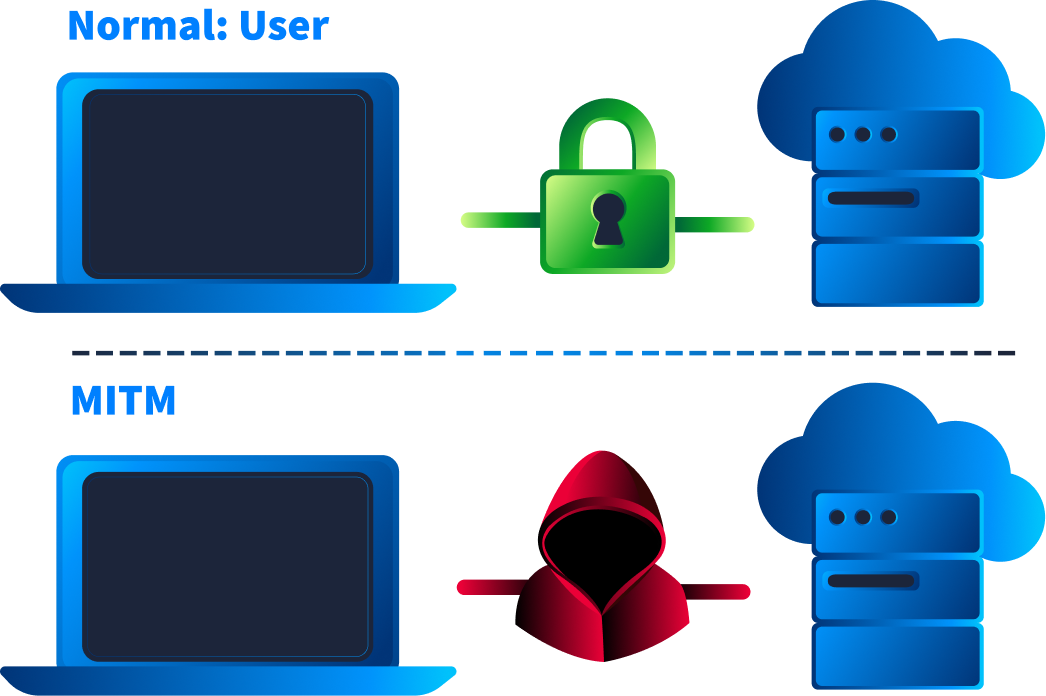
A Man-in-the-Middle (MITM) attack is a cyberattack where an attacker secretly intercepts and potentially alters communication between two parties, such as a user and a service, without their knowledge. The attacker may eavesdrop to steal sensitive data like credentials and credit card info or inject malicious content. These attacks can target any organization or individual, especially where encryption or authentication is weak.
How MITM Attacks Work
MITM attacks generally involve two main steps:
- Interception: The attacker inserts themselves into a communication stream, often by exploiting weaknesses in network protocols or by using techniques like ARP, DNS, or IP spoofing.
- Manipulation/Decryption: The attacker tries to access or modify the communication, decrypting encoded data or injecting harmful content, such as altered website responses or fake login forms
Common Types of MITM Attacks
- Packet sniffing: Capturing unencrypted data packets exchanged over a network, often on open Wi-Fi.
- Session hijacking: Stealing and using session tokens to impersonate users.
- SSL stripping: Downgrading HTTPS connections to insecure HTTP to steal or alter data transferred.
- DNS spoofing: Redirecting legitimate website traffic to fraudulent domains by manipulating DNS responses.
- IP spoofing: Crafting malicious IP packets that appear to come from trusted systems.
- Rogue Wi-Fi access point: Creating fake networks to intercept user traffic.
MITM and Cyber Kill Chain
To effectively analyze and respond to security events, an analyst must contextualize alerts within a broader model of adversary operations. Isolated indicators gain significance when mapped to the attacker’s Tactics, Techniques, and Procedures (TTPs). A widely adopted model for this is the Cyber Kill Chain, a framework that sequences the typical stages of an advanced cyber intrusion.
The framework consists of seven distinct phases:
- Reconnaissance: The adversary gathers intelligence on the target to identify vulnerabilities.
- Weaponization: The adversary couples an exploit with a malicious payload into a deliverable package.
- Delivery: The adversary transmits the weaponized package to the targeted environment.
- Exploitation: The adversary’s code is triggered, and it takes advantage of a software, hardware, or human vulnerability to gain initial access.
- Installation: The adversary installs malware or establishes a persistent backdoor on the compromised asset.
- Command & Control (C2): The adversary establishes a covert channel to communicate with and control the compromised asset.
- Actions on Objectives: The adversary executes their ultimate goals, such as data exfiltration, destruction, or lateral movement.
Situating MITM within the Cyber Kill Chain
Man-in-the-Middle is a versatile technique that adversaries primarily leverage during the Exploitation and Installation phases.
As an Exploitation Technique: A MITM attack exploits the inherent trust and design limitations of core network protocols like ARP and DNS. By manipulating these protocols, an attacker can intercept a communication channel. This act of session interception is a form of exploitation, as it violates the integrity of the network and provides the adversary with their initial foothold for eavesdropping or active manipulation.
As an Installation Vector: Once an attacker has successfully established a MITM position, they control the data stream and can use it as a delivery mechanism for malicious payloads. For example, an attacker can inject a browser exploit, a malware dropper, or a remote access trojan (RAT) into legitimate, unencrypted downloads. This action corresponds to the Installation phase, where the adversary establishes persistence or deploys additional malicious tools onto the victim’s system. Detecting an MITM attack is a critical finding. It signifies that an adversary is actively engaged in the middle stages of an intrusion, presenting a crucial opportunity for the SOC to intervene and disrupt the attack chain before the final objectives are achieved.
Task 04: Detecting ARP Spoofing
ARP Protocol
ARP (Address Resolution Protocol) maps IP addresses to MAC addresses in a local network. When a device wants to send data to another IP, it first asks: “Who has this IP?” The correct device replies with its MAC address.
ARP Spoofing
In ARP spoofing, an attacker sends fake ARP replies to trick devices into associating the attacker’s MAC address with a legitimate IP, usually the default gateway. This allows the attacker to intercept, modify, or redirect traffic.
Why ARP Spoofing Works
ARP has no authentication. Any device can send unsolicited is-at messages. An attacker exploits this vulnerability by sending fake ARP replies to victims and gateways:
192.16.10.100is at02:fe:BB:cd :55:55attacker claims to be the gateway.
Results:
- The Victim’s ARP cache becomes poisoned.
- All traffic intended for the gateway flows through the attacker first (MITM).
Indicators of the Attack
We can look for the following key indicators while investigating the logs or network traffic for a potential Man-in-the-Middle attack using ARP spoofing.
- Duplicate MAC-to-IP Mappings: Multiple MAC addresses claiming the same IP address. Indicates impersonation.
- Unsolicited ARP Replies: High number of ARP replies without matching requests (“gratuitous ARP”).
- Abnormal ARP Traffic Volume: A Large number of ARP packets in short intervals.
- Unusual Traffic Routing: Traffic rerouted through the attacker’s MAC.
- Gateway Redirection Patterns: Multiple destination MACs for the same gateway IP.
- ARP Probe / Reply Loops: Many ARP requests with Who has 192.168.1.x? Tell 192.168.1.y patterns
Network Information
For the case investigated, we have the following information about the network:
| Role | IP | MAC | Notes |
|---|---|---|---|
| Gateway | 192.168.10.1 | - | Legit router |
| Attacker | - | - | - |
| Victim | - | - | - |
| Domain | corp-login.acme-corp.local | - |
Network Traffic Analysis
Let’s begin our investigation by examining the ARP traffic and seeing how we can identify and detect ARP spoofing in the network traffic. Open up the network-traffic.pcap placed at the mitm_traffic folder on the Desktop, and follow the steps mentioned below:
Narrowing down ARP traffic
As the ARP is the protocol of interest, we can start by isolating it using the following filter. This will allow us to inspect requests/replies and notice abnormal volume or patterns.
Filter: arp
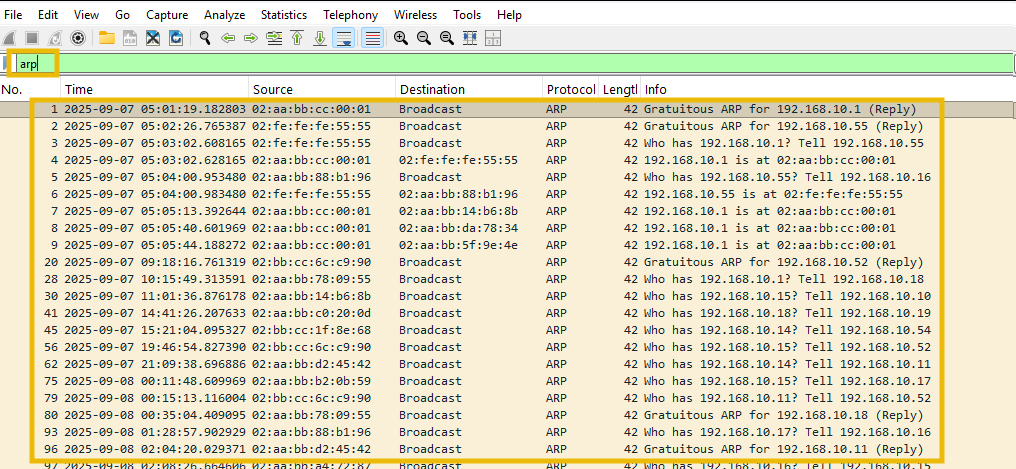
You’ll see requests and replies (who-has and is-at) pointing to both ARP requests and responses. We can examine the results for any abnormal and repeated requests or responses.
Important Note: Press CTRL + ALT + 1 to fix the time displayed
ARP Requests
Let’s look at the ARP requests, as shown below.
Filter: arp.opcode == 1
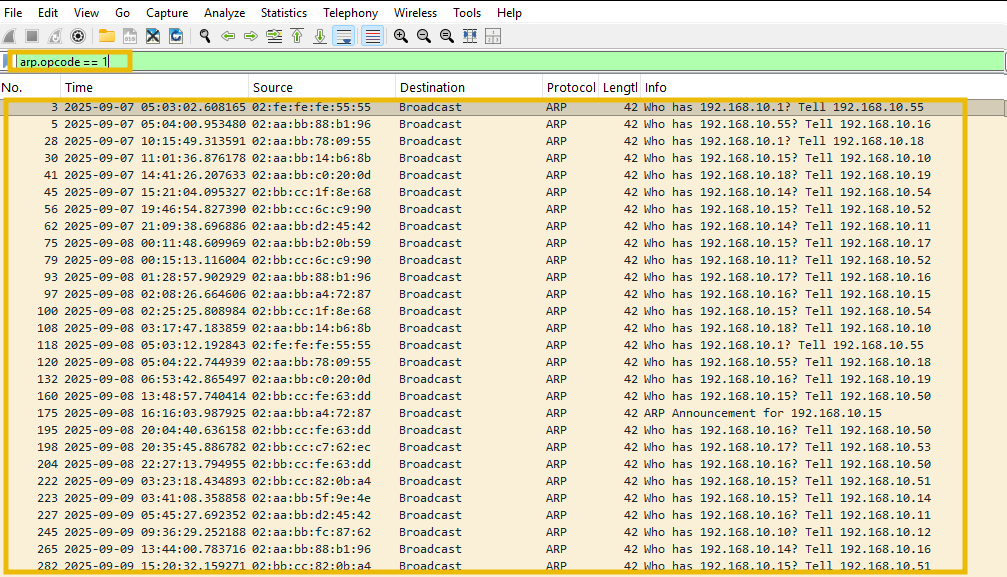
This shows all the ARP requests captured from different hosts.
ARP Response
Forged ARP poisoning typically uses unsolicited is-at replies (gratuitous/unasked replies). These are strong indicators. Let’s look at the ARP response, as shown below:
Filter: arp.opcode == 2
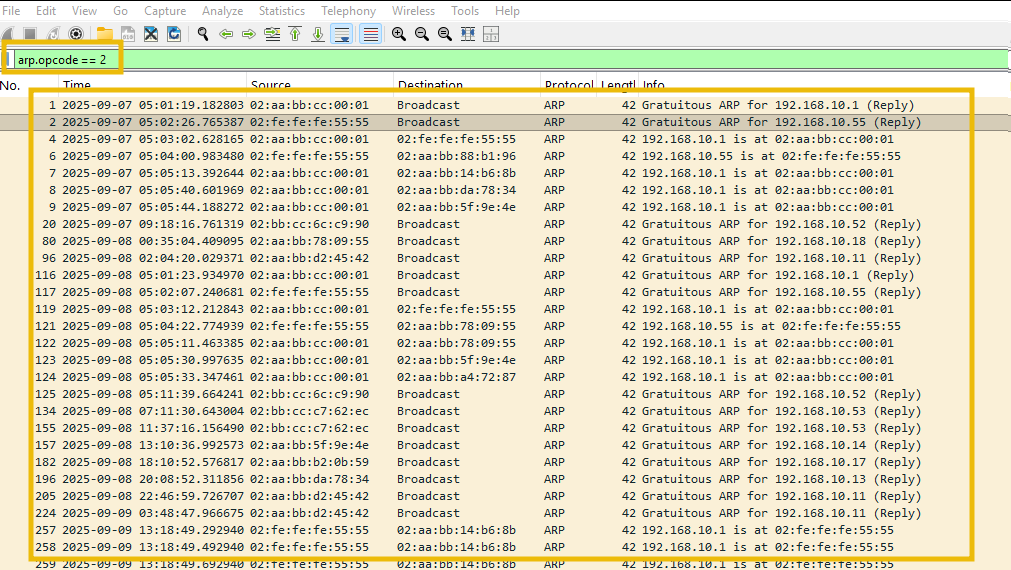
This filter displays ARP responses from various hosts. Examining these closely reveals multiple responses, including gratuitous ones. Legitimate replies typically correspond to recent “who-has” requests. Suspicious activity is indicated by numerous replies with no visible requests or repeated advertisements of the same IP address from a suspicious MAC address.
Gratuitous ARP Responses
A suspicious host sends many unsolicited (gratuitous) ARP replies, especially to multiple destinations. Repeated gratuitous ARPs can indicate an attacker maintaining their poison state. We can also filter on the gratuitous packets, as shown below:
Filter: arp.isgratuitous

ARP traffic associated with the Gateway
We have the information about the IP and the MAC address associated with the gateway. Let’s apply the following filter to examine the ARP traffic associated with the gateway, as shown below:
Filter: arp && arp.src.proto_ipv4 == 192.168.10.1 && eth.src == 02:aa:bb:cc:00:01
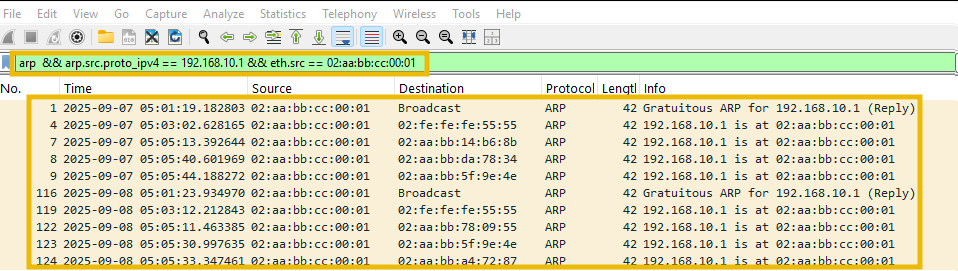
Looking at the output, we can see only the ARP responses. Let’s now narrow down on the Gateway IP to further probe about the MAC addresses associated with the IP, using the following filter as shown below:
Filter: arp.opcode == 2 && arp.src.proto_ipv4 == 192.168.10.1
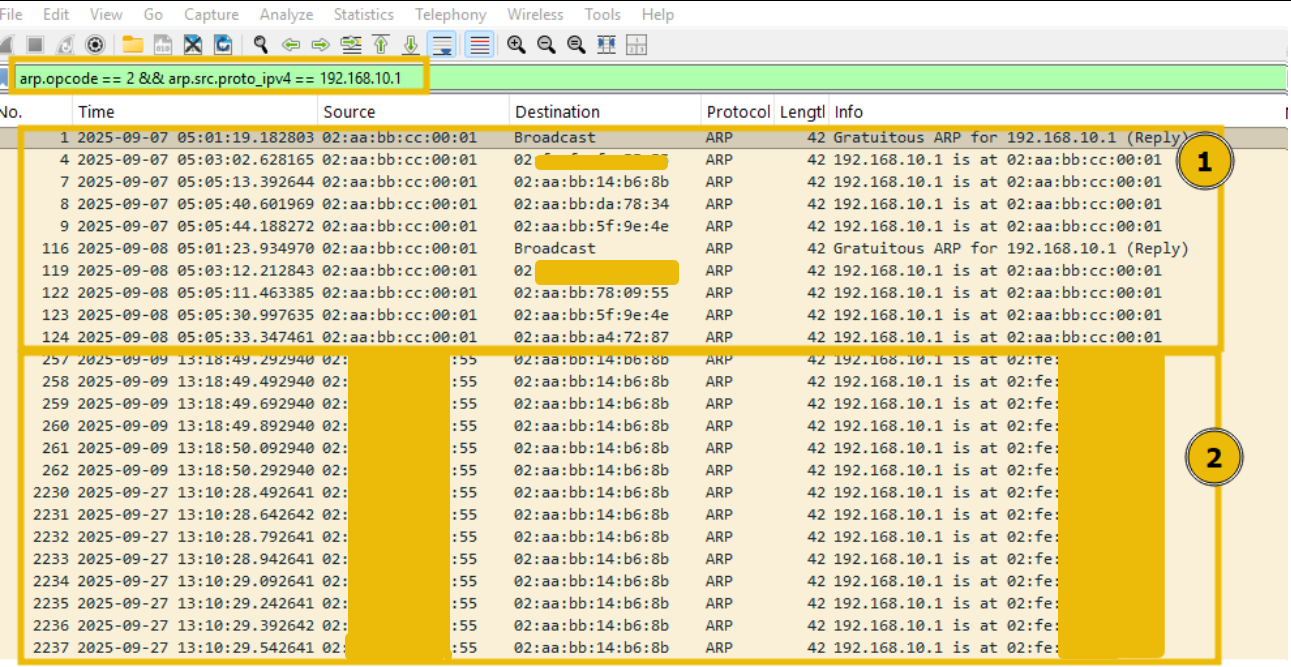
This output looks interesting. Looking closely, we see some ARP replies pointing the Gateway’s IP to the suspicious MAC address. The frequency of these ARP replies indicates that this is indeed an ARP spoofing. Let’s confirm by applying another filter, as shown below:
Filter: arp.opcode == 2 && _ws.col.info contains "192.168.10.1 is at"
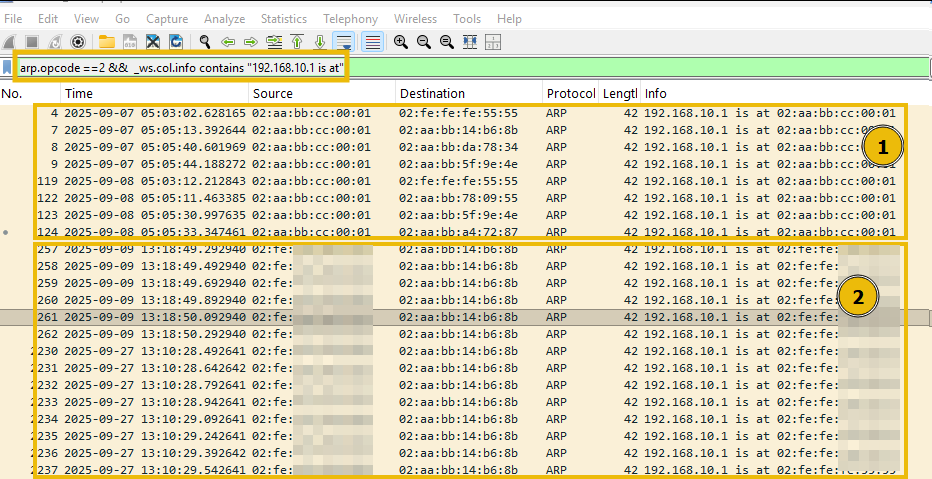
This filter has two parts. The first part focuses on the ARP responses and the second part _ws.col.info contains "192.168.10.1 is at" filters on the content shown in the information column. This filters out the ARP responses, which are pointing the Gateway’s IP 192.168.10.1 to the MAC address. But if we look closely, we can see that the attacker uses ARP spoofing to tell the IP to its MAC address. We can also use this filter arp.opcode == 2 && arp.src.proto_ipv4 == 192.168.10.1, which shows the same result.
Examining the suspicious MAC address
Now that we have identified ARP spoofing in action, let’s narrow down on the attacker’s MAC address that has associated itself with the Gateway’s IP address, using the following filter:
Filter: arp.opcode == 2 && arp.src.proto_ipv4 == 192.168.10.1 && eth.src == 02:fe[REDACTED]

Check for Duplicate IP-to-MAC Mappings
The last thing we can check and confirm is by filtering on the Check for duplicate MAC address mappings to a single IP address.
Filter: arp.duplicate-address-detected || arp.duplicate-address-frame
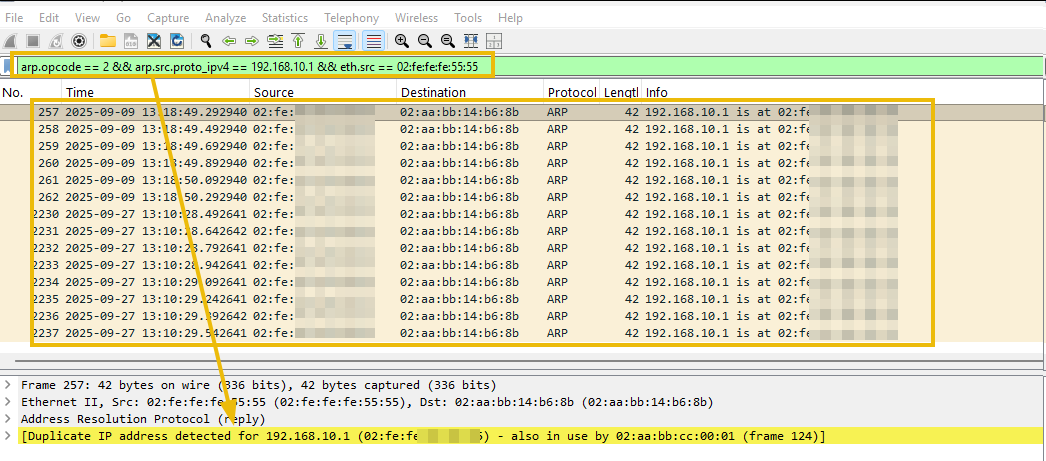
This result indicates that the attacker successfully performed ARP spoofing and positioned himself between the victim and the gateway. Let’s move on to the next task and examine how the attacker could perform a DNS spoofing attack to get the redirection.
Answer the questions below
How many ARP packets from the gateway MAC Address were observed?
arp && arp.src.proto_ipv4 == 192.168.10.1 && eth.src == 02:aa:bb:cc:00:01
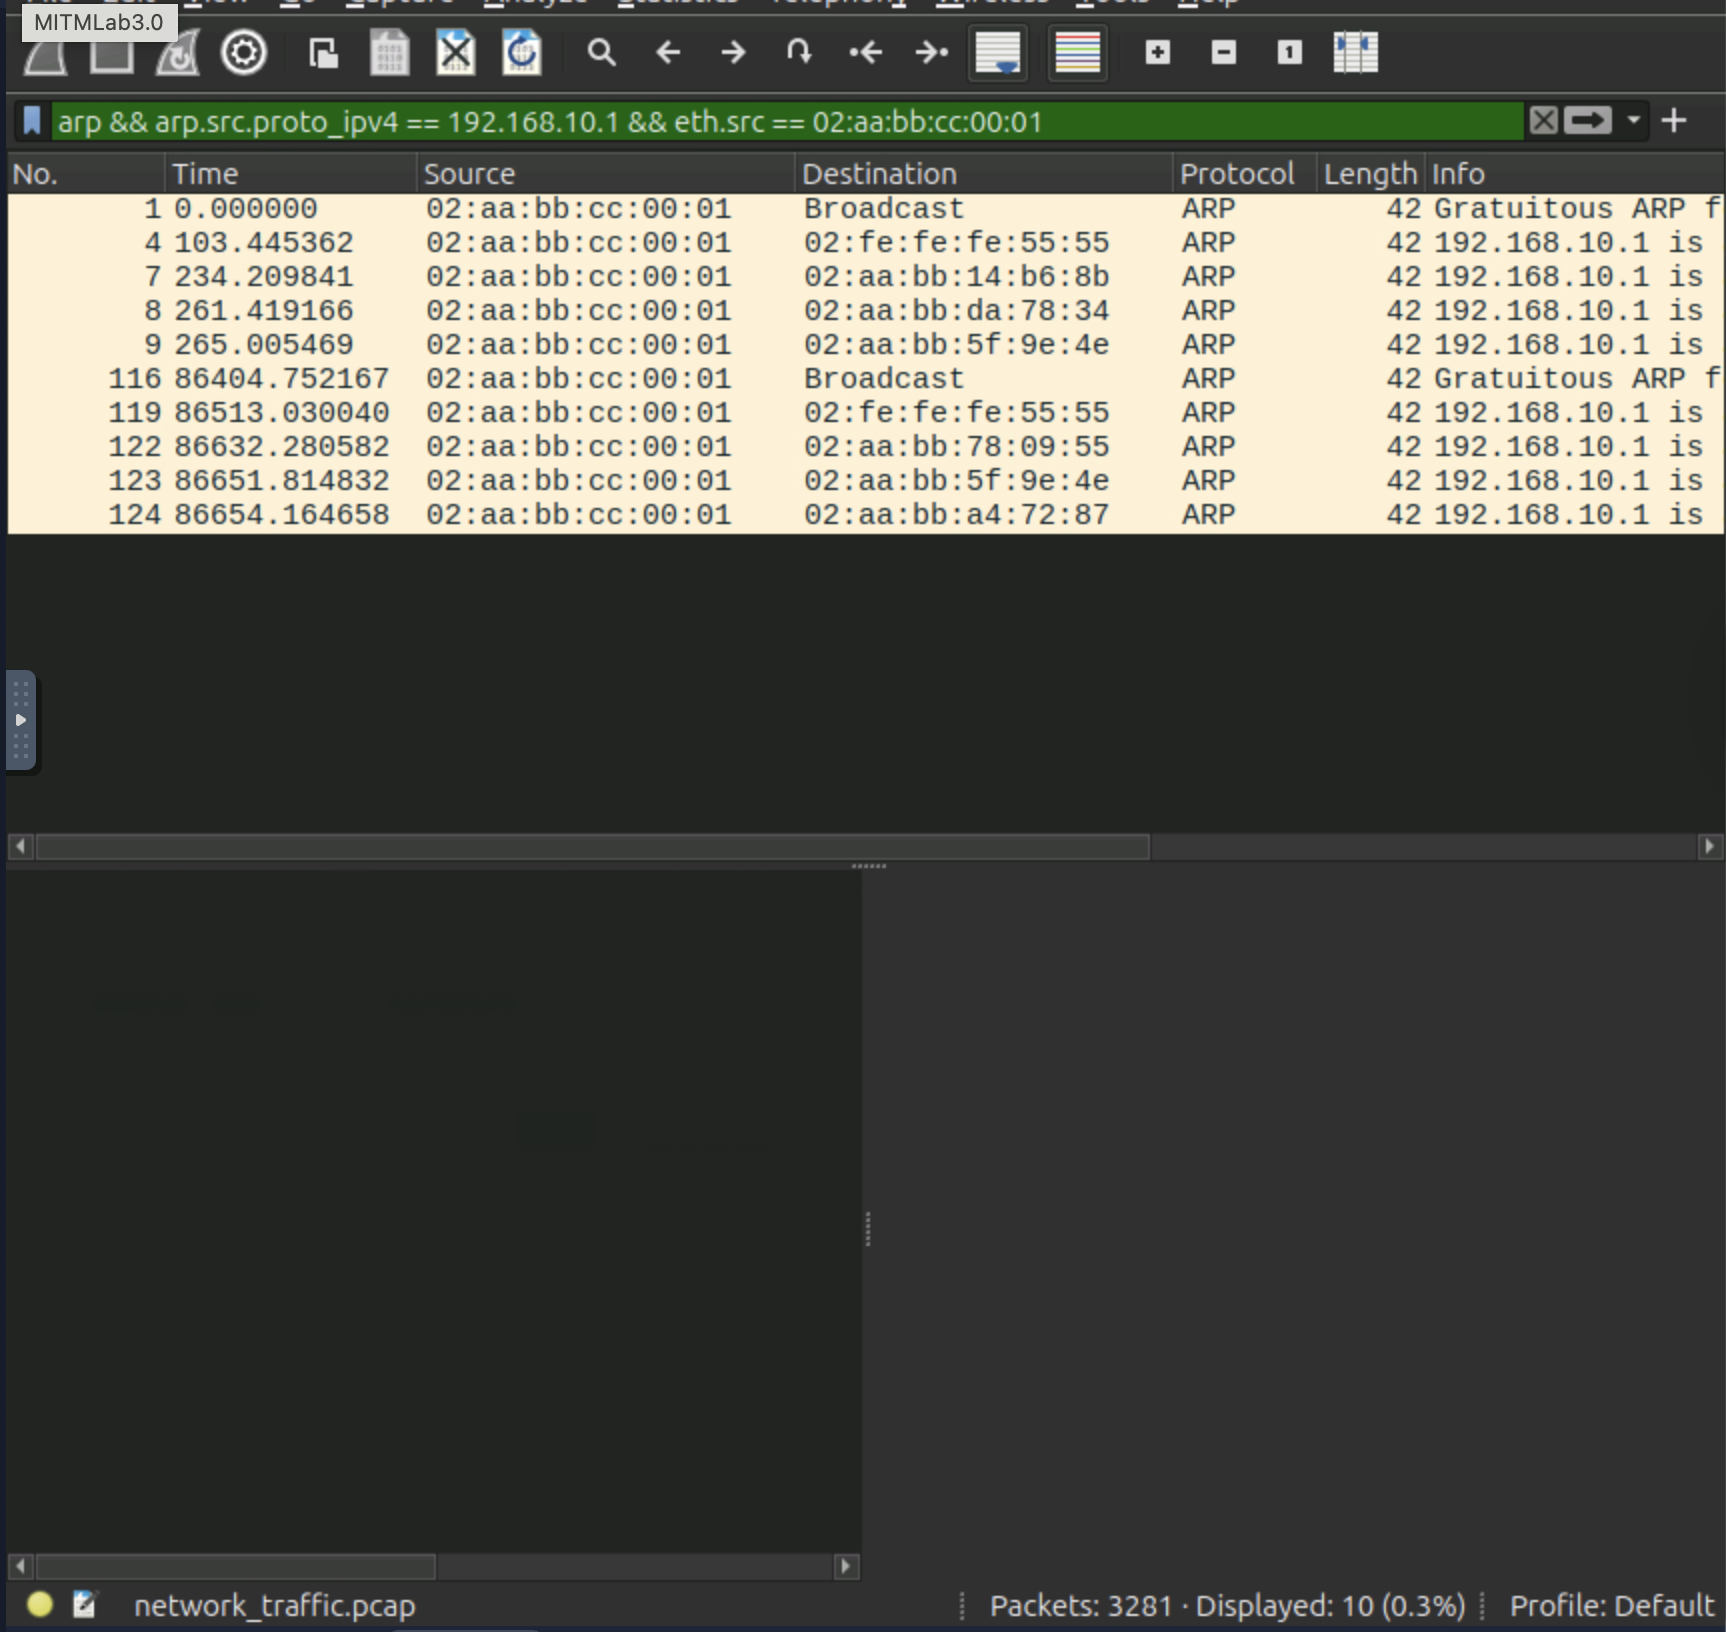
Answer: 10 packets captured in the filtered view.
What MAC address was used by the attacker to impersonate the gateway?
arp.duplicate-address-detected || arp.duplicate-address-frame
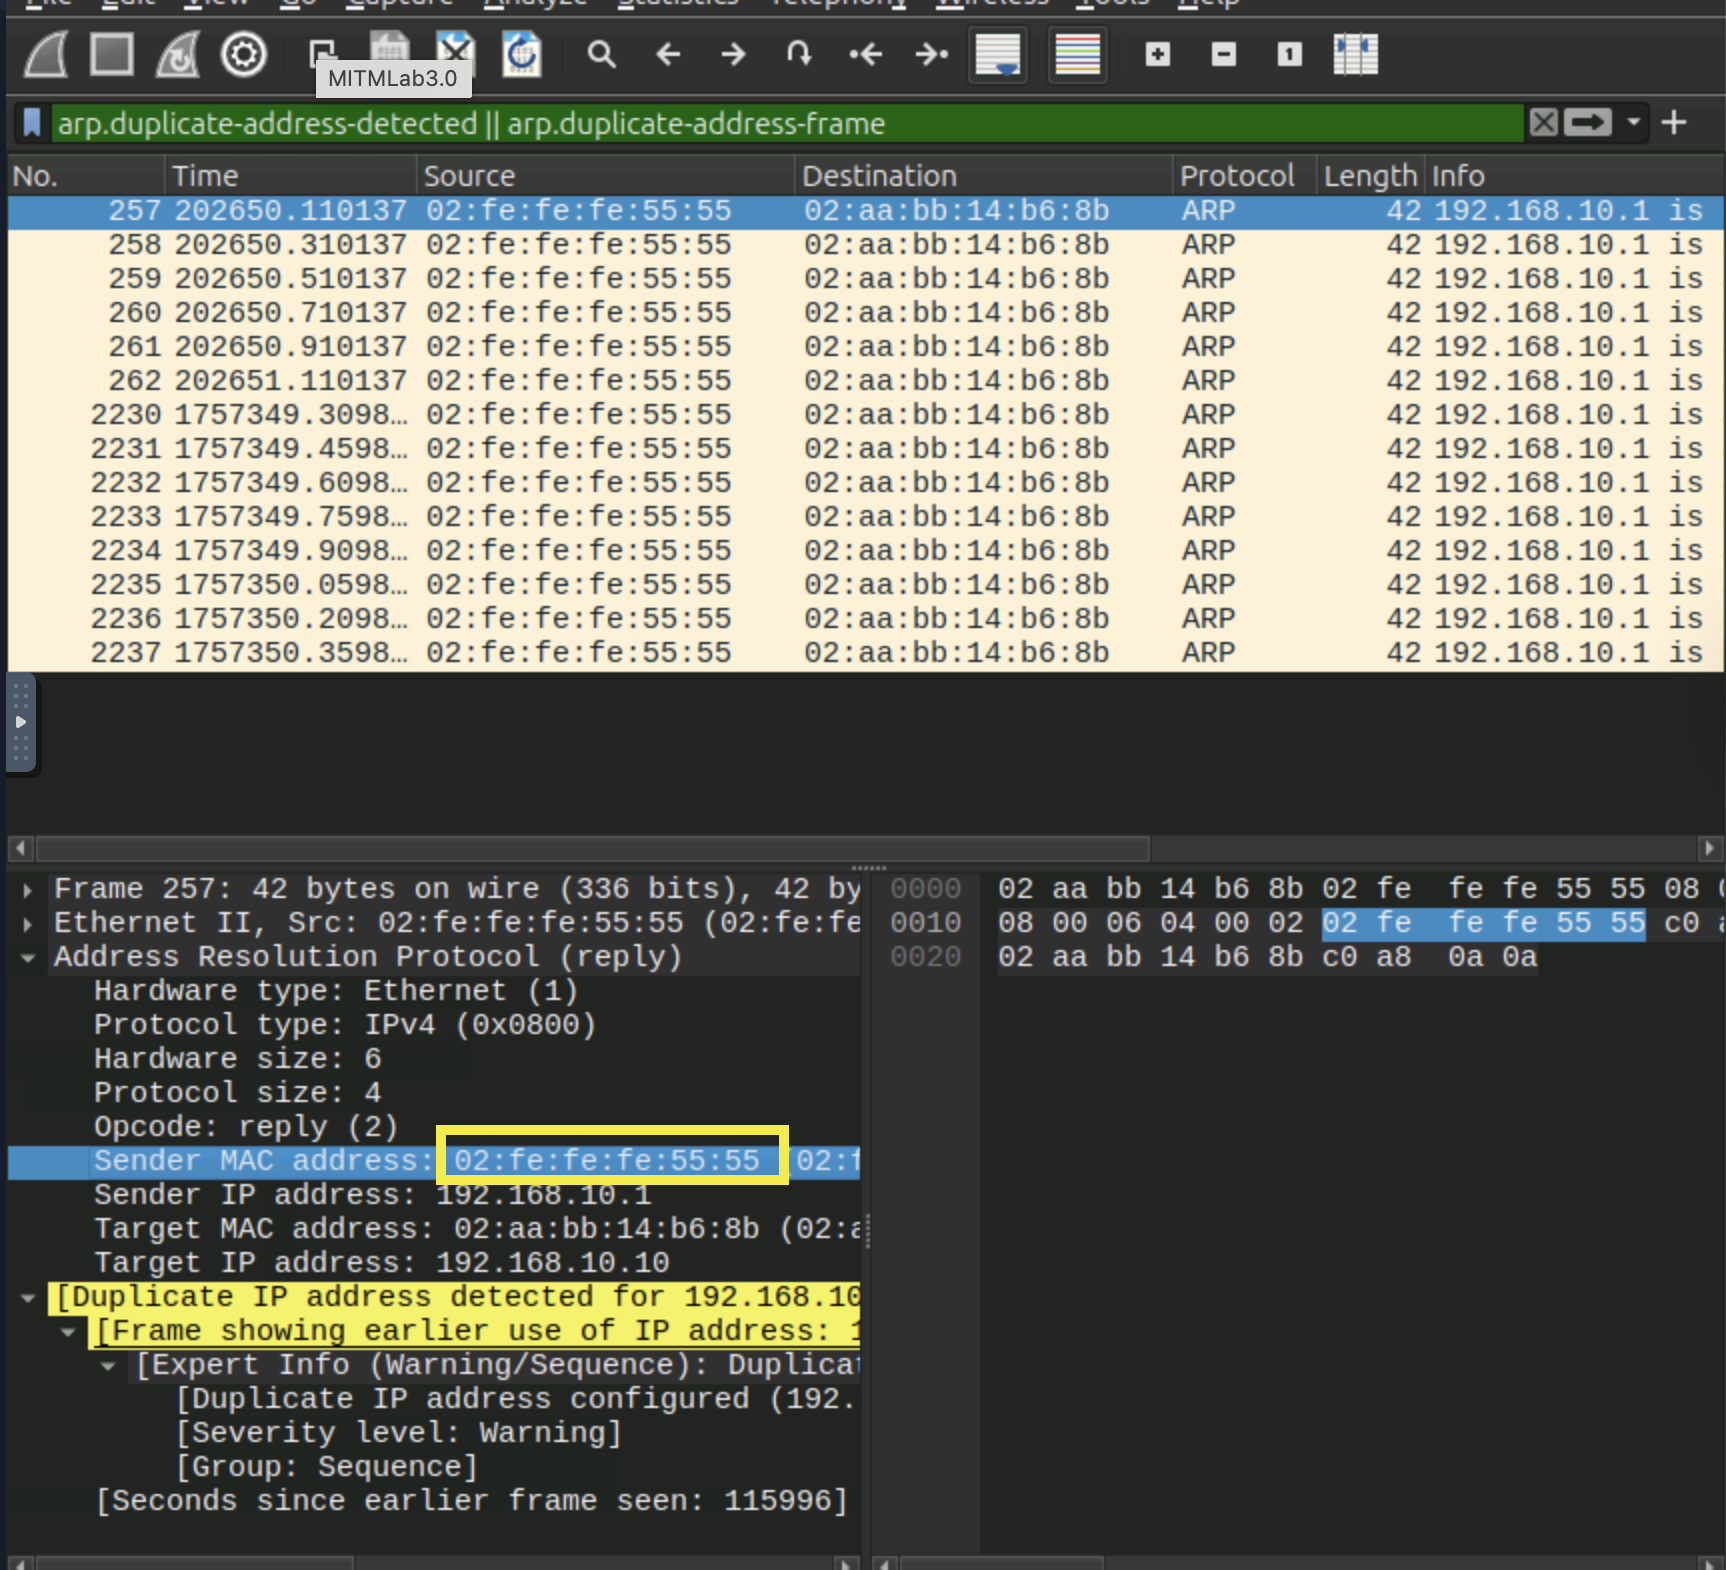
Answer:
02:fe:fe:fe:55:55.
How many Gratuitous ARP replies were observed for 192.168.10.1?
arp.isgratuitous && arp.src.proto_ipv4 == 192.168.10.1

Answer: 2 gratuitous replies.
How many unique MAC addresses claimed the same IP (192.168.10.1)?
arp.opcode==2 && _ws.col.info contains “192.168.10.1 is at”
Answer: 2 MAC addresses (the legitimate gateway and the impersonating attacker).
How many ARP spoofing packets were observed in total from the attacker?
arp.opcode == 2 && arp.src.proto_ipv4 == 192.168.10.1 && eth.src == 02:fe:fe:fe:55:55
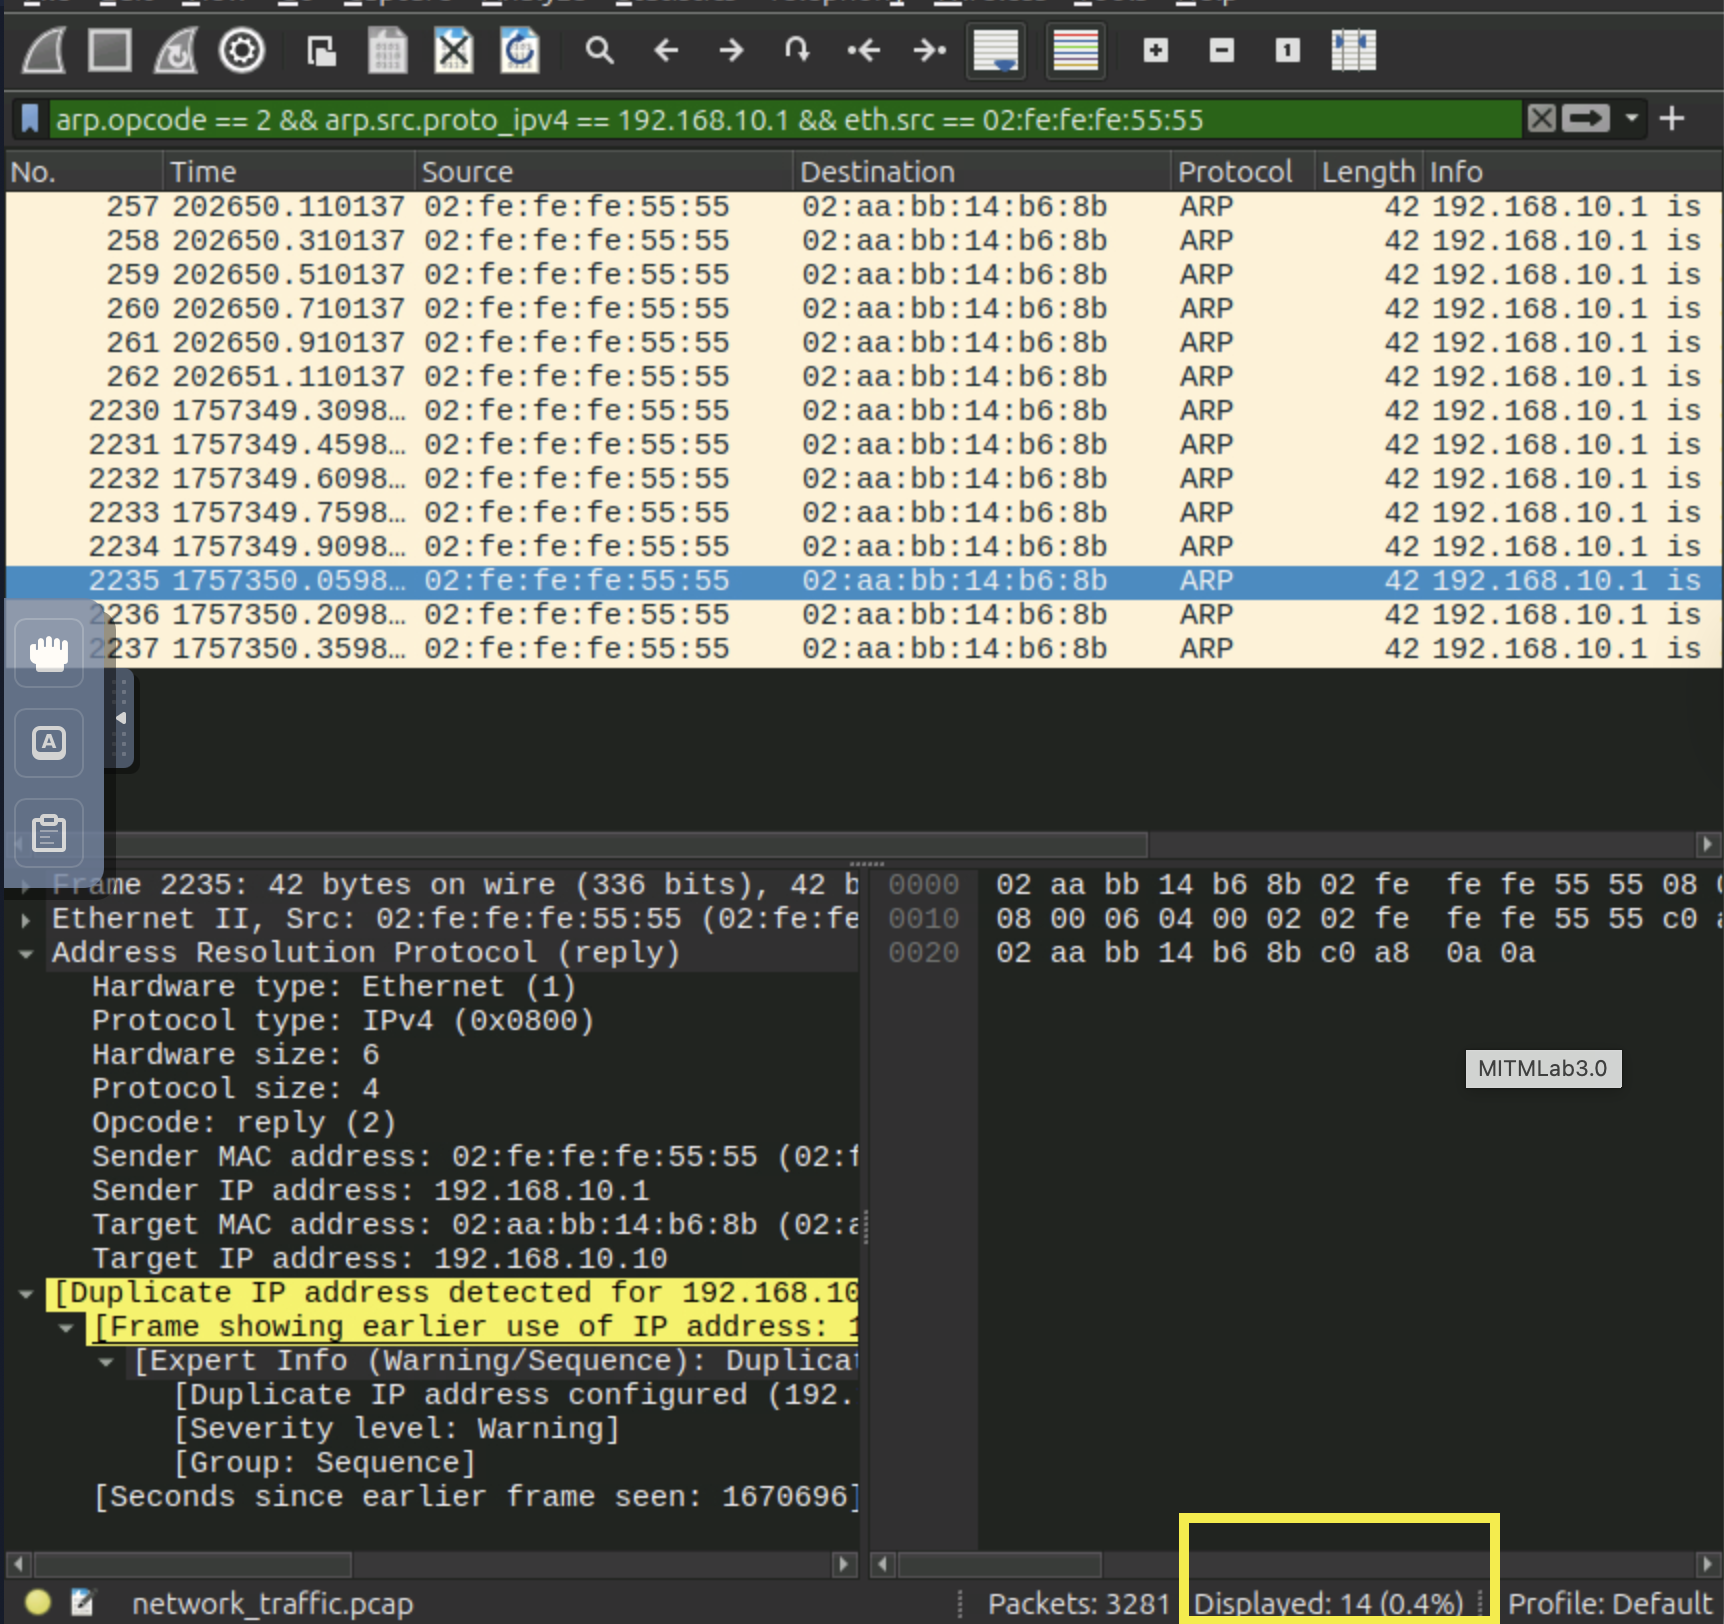
Answer: 14 spoofed responses originated from the attacker.
Task 05: Unmasking DNS Spoofing
DNS Protocol Simplified
First, let’s understand DNS. Think of it as your phone’s contact list. You don’t remember your friends’ phone numbers; you tap on their names. Similarly, DNS translates human-friendly website names (like www.google.com) into computer-friendly IP addresses.
DNS Spoofing (or DNS Cache Poisoning) is when an attacker corrupts this system. They give your computer the wrong “phone number” for a website you’re trying to visit.
This is a powerful technique for launching a Man-in-the-Middle (MITM) attack. Here’s how it works:
- The Victim tries to visit their bank at
my-real-bank.com. - The Attacker, who is already on the local network (perhaps via ARP spoofing), intercepts the victim’s DNS query.
- The Spoof: The attacker quickly sends a fake DNS response to the victim. This fake response says,
my-real-bank.comis at my IP address:ATTACKER_IP. - The Interception: The victim’s computer trusts this fake response and saves it in its DNS cache. When the victim tries to connect to their bank, they unknowingly connect directly to the attacker’s server, which might host a perfect replica of the real banking site.
The attacker is now
in the middle, capturing everything the victim types, including their username and password.

Indicators of the Attack
We can look for the following key indicators while investigating the logs or network traffic for a potential Man-in-the-Middle attack using DNS spoofing.
- Multiple DNS responses for the same query: A legitimate resolver and a forged responder reply to the same query. This is the single most reliable indicator.
- DNS response from an unexpected source: A DNS reply arrives from an IP address that does not match any configured resolver (like 8.8.8.8 or your DNS server).
- Suspiciously short TTL (Time-To-Live) values: Attackers use very low TTLs (1 - 30s) to keep poisoned entries short-lived and reassert control.
- Unsolicited DNS responses: A DNS reply appears without a corresponding DNS request from the victim.
Network Traffic Analysis
Let’s begin our investigation by examining the DNS traffic and how we can identify and detect DNS spoofing in the network traffic. Open up the network-traffic.pcap placed at the mitm_traffic folder on the Desktop, and follow the steps mentioned below:
Narrowing down DNS traffic
As the DNS is the protocol of interest, we can start by isolating it using the following filter. This will allow us to inspect requests/replies and notice abnormal volume or patterns.
Filter: dns
The output contains both the DNS requests and corresponding responses.
Filtering on Legit traffic
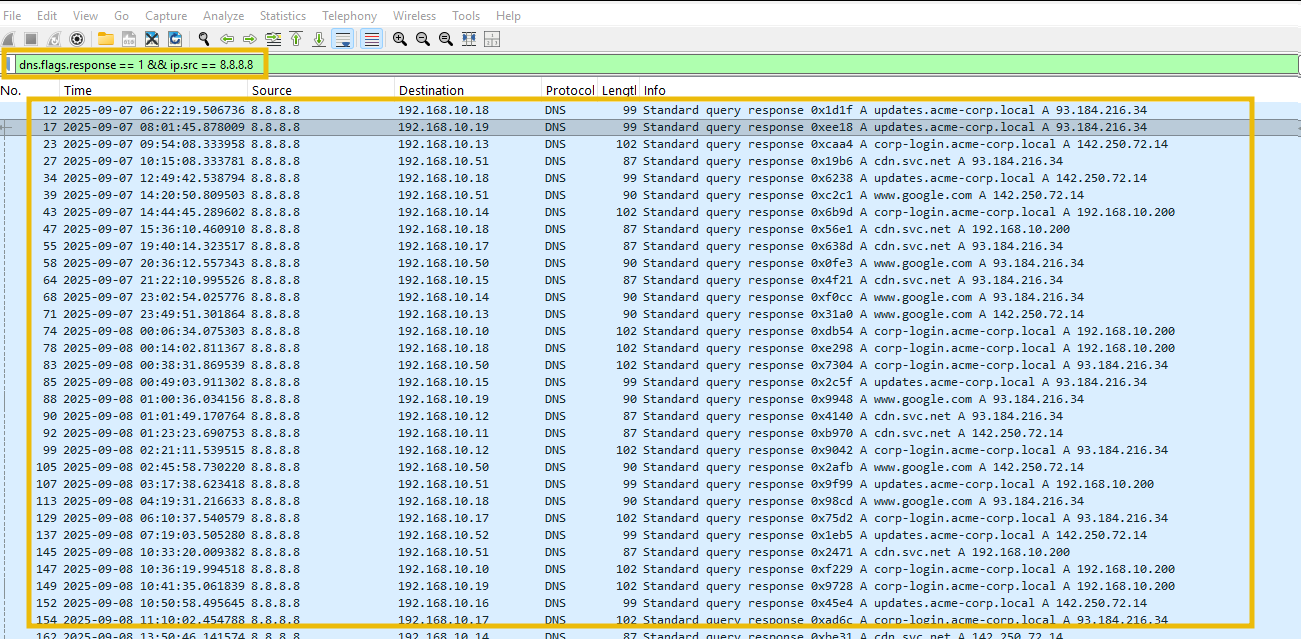
Legitimate DNS servers (like Google’s 8.8.8.8) respond from a known external IP address. By filtering responses from this IP, we can see what normal answers look like for comparison.
Filter: dns.flags.response == 1 && ip.src == 8.8.8.8
The result shows valid DNS replies from the legitimate DNS server.
Examine DNS Responses
Let’s look at the DNS responses, using the filter below.
Filter: dns.flags.response==1
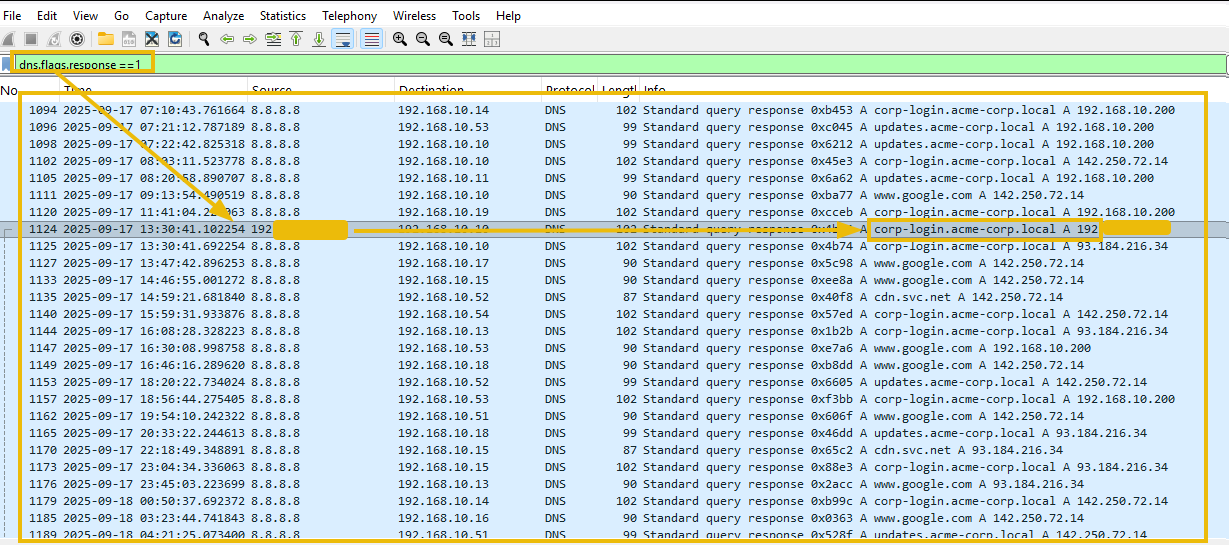
In the output, we can hunt for responses from IP addresses other than the usual DNS server. Looking closely, we find one DNS response from an IP other than 8.8.8.8. This is an interesting find. Though we have discovered an odd DNS request indicating a potential DNS spoofing attempt, we will note this and return to it later.
DNS response from DNS Server
The following filter will show the DNS responses from the DNS server.
Filter: dns.flags.response == 1 && ip.src == 8.8.8.8
DNS request for our Domain
Let’s now take a curious look at the DNS traffic for our domain of interest, corp-login.acme-corp.local, using the following filter:
Filter: dns && dns.qry.name == "corp-login.acme-corp.local"

Let’s now filter on the DNS request for our domain of interest, originating from the DNS server, using the filter, as shown below:
Filter: dns.flags.response == 1 && ip.src == 8.8.8.8 && dns.qry.name == "corp-login.acme-corp.local"
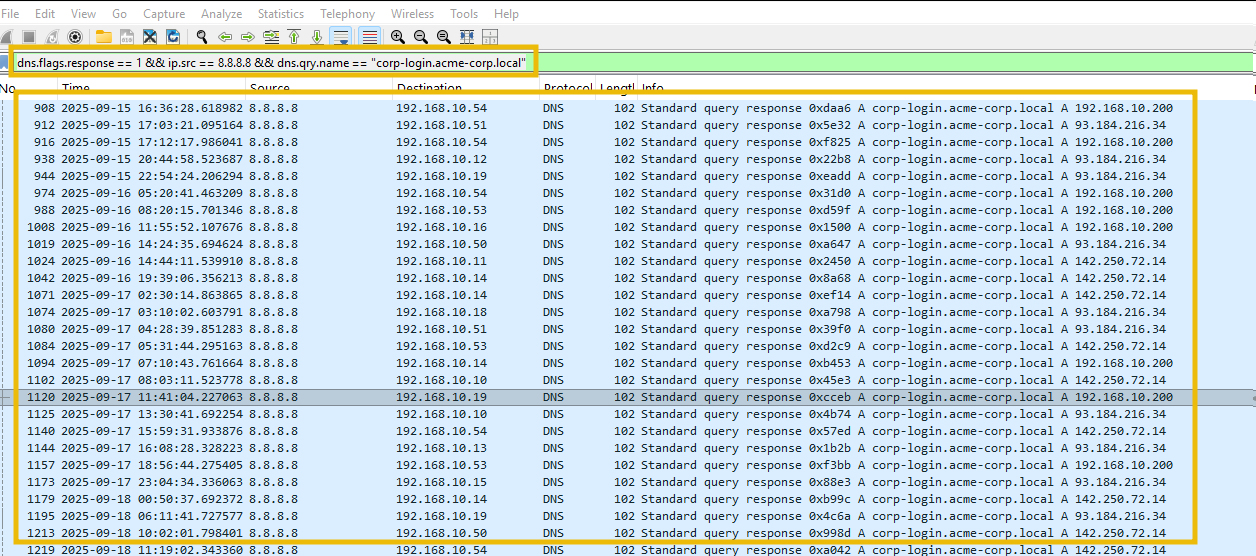
The output also looks very much normal, as expected.
DNS responses other than the DNS Server.
In the previous results, we explored the DNS traffic originating from the DNS servers for our domain of interest. Let’s apply the following filter to see if any DNS requests are coming from servers other than the DNS server 8.8.8.8:
Filter: dns.flags.response == 1 && ip.src != 8.8.8.8 && dns.qry.name == "corp-login.acme-corp.local"

Analysis Summary
The analysis in the previous two tasks shows:
- A successful multi-stage Man-in-the-Middle attack where the attacker first poisoned the ARP mapping for the gateway (192.168.10.1)
- Followed by the forged DNS replies for corp-login.acme-corp.local that redirected the victim to the attacker’s IP.
Let’s move on to the next task: understanding why SSL stripping is used and finding the evidence of SSL stripping that resulted in the victim’s data theft.
Answer the questions below
How many DNS responses were observed for the domain corp-login.acme-corp.local?
dns && dns.qry.name == "corp-login.acme-corp.local" && dns.flags.response == 1
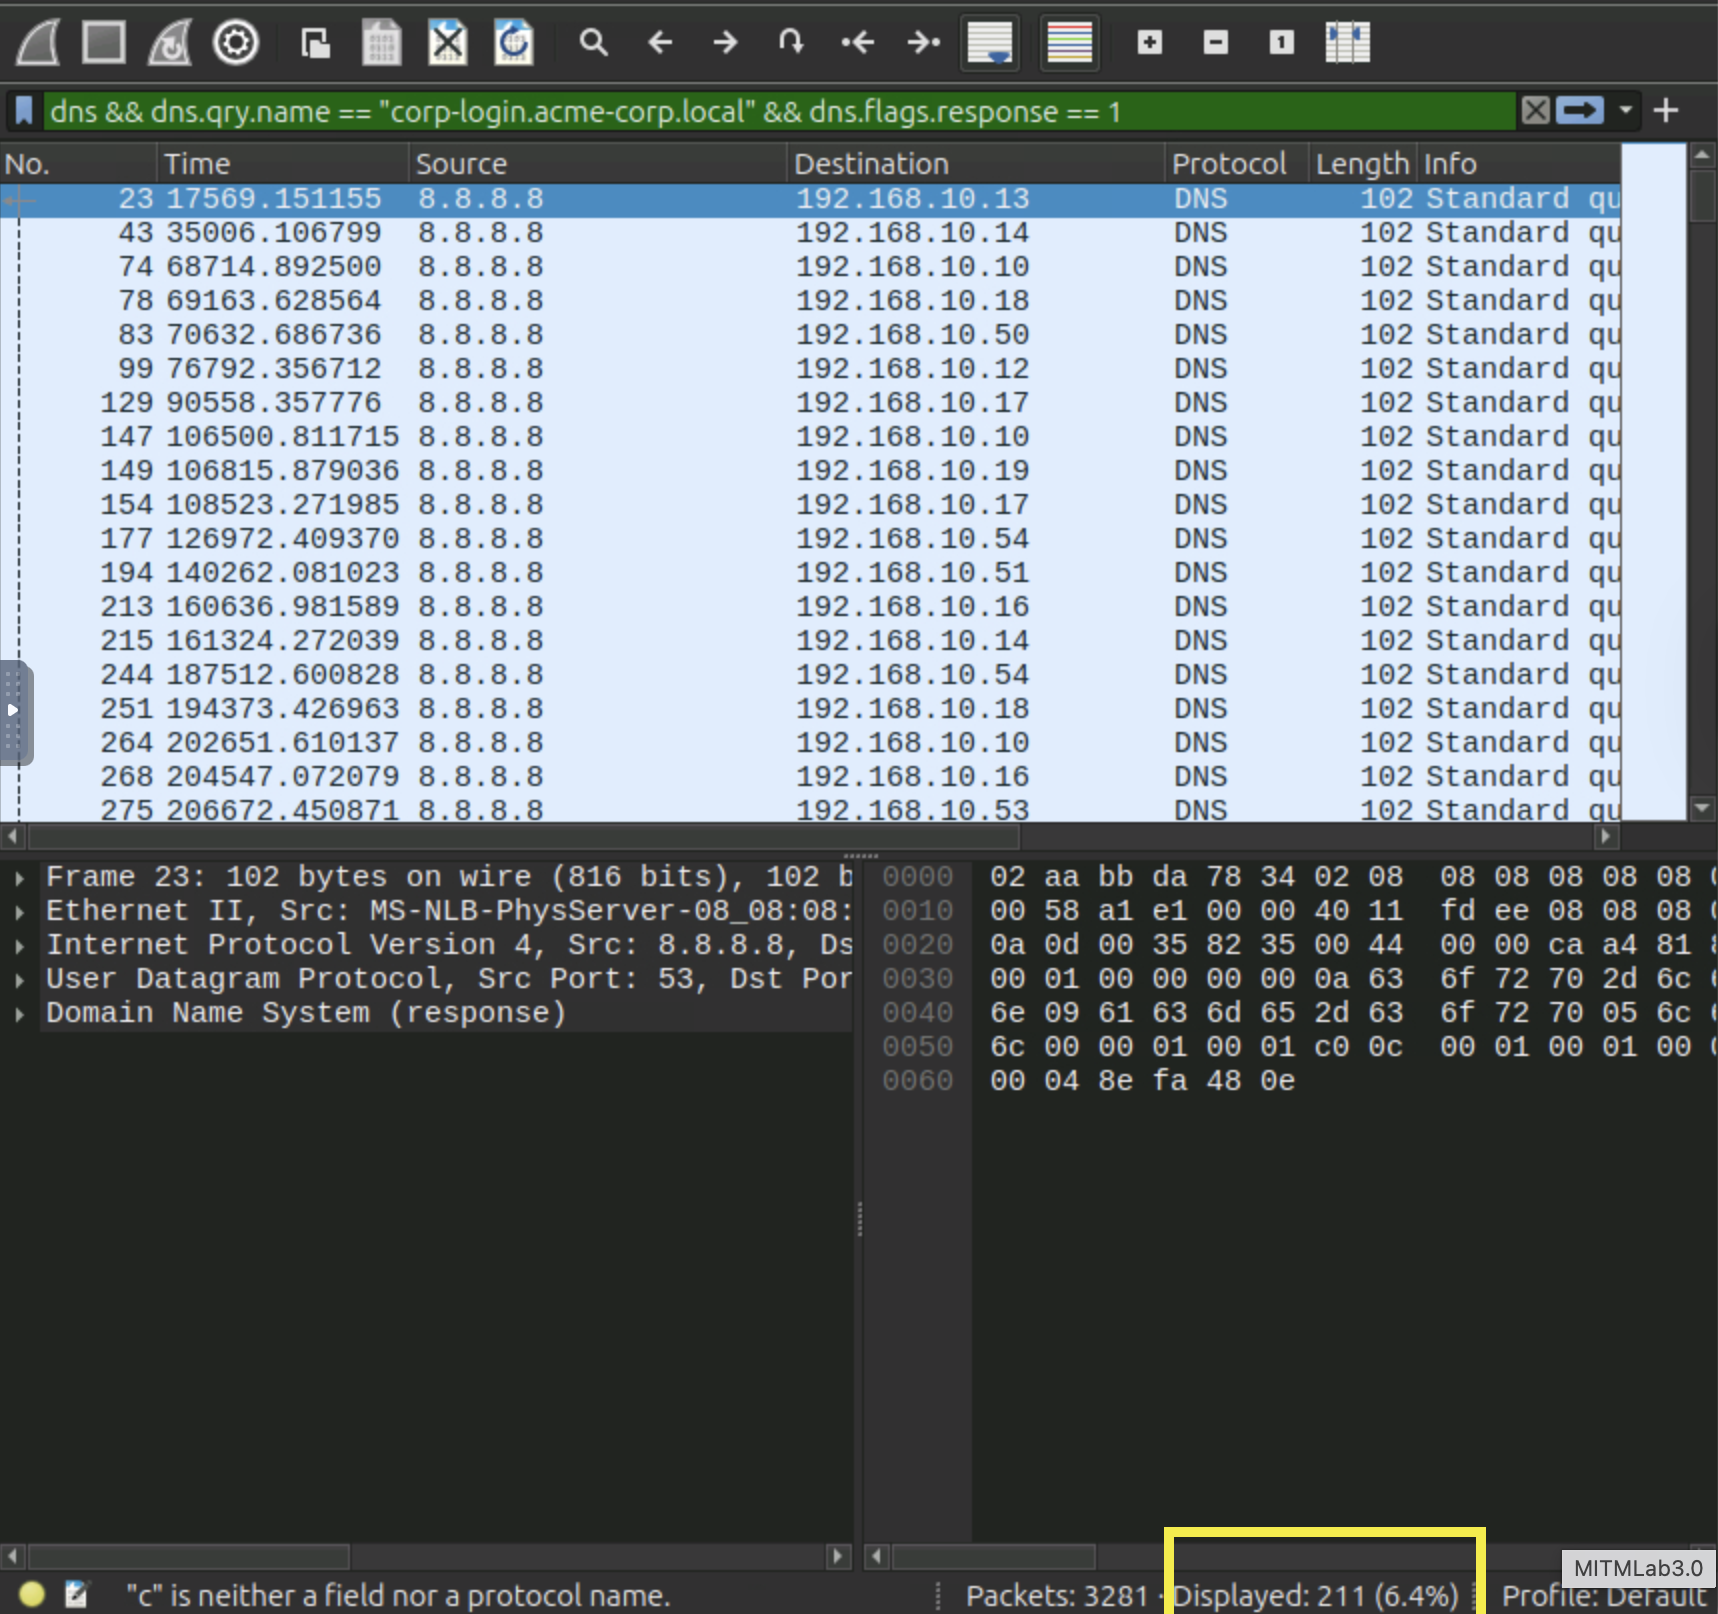
Answer: 21 DNS responses returning data for the portal.
How many DNS requests were observed from the IPs other than 8.8.8.8?

Answer: 2 forged responses sourced from
192.168.10.55.
What IP did the attacker’s forged DNS response return for the domain?
192.168.10.55
Answer: The victim was redirected to
192.168.10.55.
Task 06: Spotting SSL Stripping in Action
SSL stripping is a man-in-the-middle technique in which an attacker intercepts and modifies traffic to remove or prevent TLS encryption between a client and a server. This causes the client to communicate over HTTP instead of HTTPS. The attacker retains a secure (HTTPS) session with the server while relaying plain HTTP to the victim, enabling eavesdropping and credential capture.
How It Works
- The victim initiates an HTTPS request to a website.
- The attacker intercepts the request using ARP spoofing or a rogue access point.
- The attacker connects to the website over HTTPS but relays the response to the victim through HTTP.
- The victim unknowingly interacts over HTTP, exposing sensitive data in plaintext
Indicators of SSL stripping
- Initial Request vs. Response: The user’s initial request may be for HTTPS (port 443), but the subsequent packets immediately shift to unencrypted HTTP (port 80) for the same domain.
- Redirects/Link Rewriting: Monitoring for redirects (HTTP Status Codes 301, 302) that persistently direct an HTTPS request to an HTTP resource.
- Certificate Errors: Although the attacker usually tries to hide this, the initial TLS/SSL Handshake may fail or display a self-signed certificate if the attacker uses a more direct proxying technique.
Network Traffic Analysis
Let’s continue our investigation by examining the same network traffic. pcap file in Wireshark. In this task, we will look at SSL traffic and see if we can identify any of the indicators mentioned above.
Narrowing down SSL traffic
For this task, HTTPS is the protocol of interest. We start by isolating it using the following filter. This will allow us to inspect SSL requests and notice abnormal volumes or patterns.
Filter: tls || ssl
This filter will show all the traffic associated with SSL.
Examine the SSL traffic of our Server.
Let’s apply the following filter to show the established TLS handshakes to our server, which proves the site normally uses TLS for communication.
Filter: tls.handshake.type == 1 && tls.handshake.extensions_server_name == "corp-login.acme-corp.local"
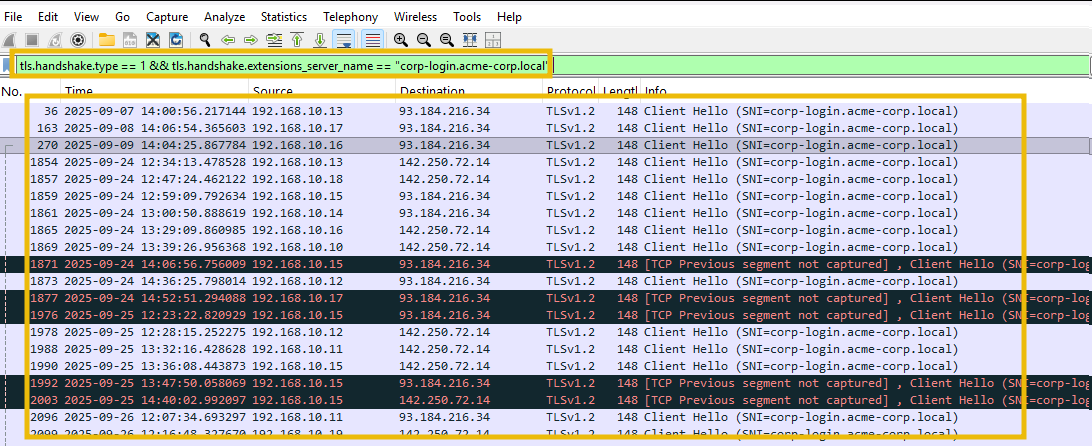
One of the key observations from the above output is the confirmation that the domain in question uses TLS for communication.
Show DNS redirect that precedes stripping.
Our hypothesis about SSL stripping is that it is done after the attacker has successfully performed DNS spoofing, sending the victim to the attacker’s IP. In the previous task, we identified the attacker’s IP address performing the DNS spoofing. Let’s isolate DNS responses from the attacker to show the victim was pointed to the attacker’s IP, as shown below:
Filter: dns.flags.response == 1 && ip.src == 192.168.10.55 && dns.qry.name == "corp-login.acme-corp.local"

Verify TLS disappears
One of the main indicators of SSL stripping is that, after the spoof, the domain no longer performs TLS handshakes to the legitimate server, which validates the absence of TLS traffic from the victim to the real server. Let’s apply the following filter on the server IP and the attacker IP, as shown below:
Filter: http && ip.src == 192.168.10.10 && ip.dst == 192.168.10.55

We can clearly see that the victim connected to the server after SSL stripping and logged in.
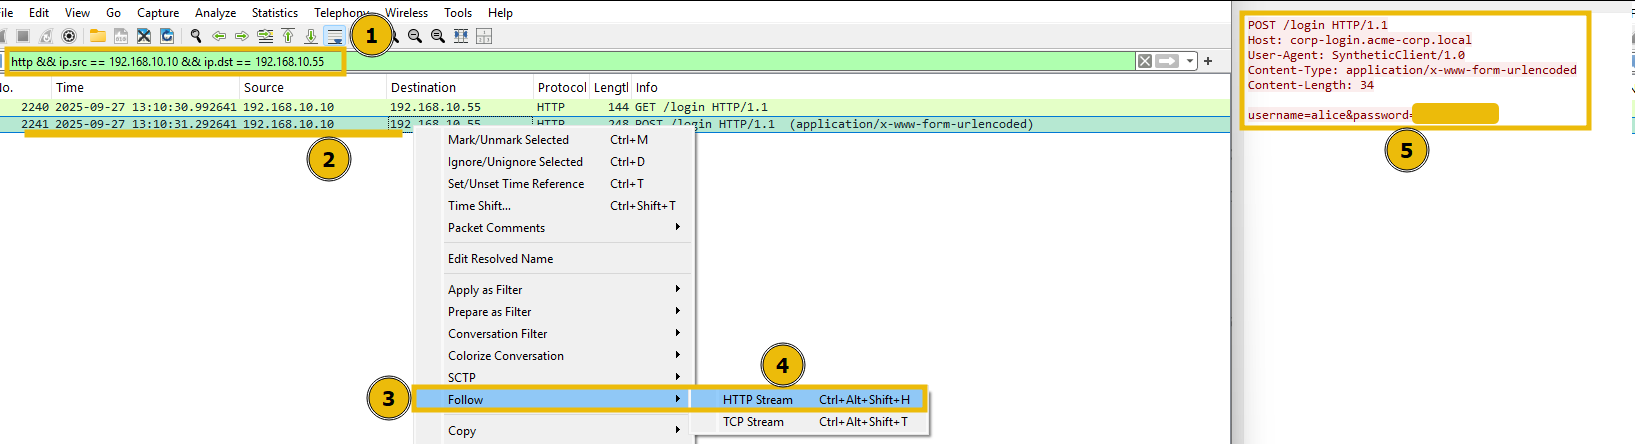
We can also identify the user’s credentials in plaintext, which confirms that the attacker was able to obtain the victim’s credentials. Though there are other SSL stripping indicators as well that we should be looking at. In this scenario, we only observed one indicator, where HTTPS traffic of our portal was stripped down to HTTP.
Task 06: Answer the questions below
How many POST requests were observed for our domain corp-login.acme-corp.local?
Filter: http.request.method == "POST"

Answer: 1 credential submission.
What’s the password of the victim found in the plaintext after successful ssl stripping attack.
Use the same http.request.method == "POST" filter and read the packet data.

Answer: Password
Secret123!(submitted by useralice).
Task 07: Conclusion
My View: Lab is well designed and informative; I loved it while solving the challenge.